Showing posts with label recipes. Show all posts

Wednesday, August 31, 2011

Brownie Pops For Cheaters

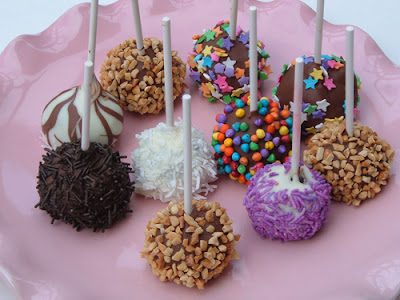
I fully expected this post to be titled "Brownie Pop Fail", but I had to come up with a new title when my Brownie Pops actually looked pretty cute, and more importantly, didn't fall off the stick.


I can't believe I made these!

I've been fascinated by these adorable little desserts on a stick for a long time; I mean Martha Stewart makes Cake Pops.

Cake Pops are even available at Starbucks.  Starbucks sells these little guys for almost $2.00 each (including tax), which must mean they're pretty special and difficult to make.  Right?


So I felt that the odds were stacked against me when I decided, on a whim, to make my own - with Purplicious as my trusty sidekick.


I visited Bakerella and Martha Stewart for instructions and tips on making Cake Pops.  


Since I was convinced that my Brownie/Cake Pops were going to be a disaster, I decided to cheat and use store bought brownies and canned Betty Crocker frosting as the basis for my treats... that's just how I roll.


This is how I made easy (but not quick) Brownie Pops:

  • I tossed half of a 1.34 kg (3 lbs) container of Two Bite Brownies (the kind you find at Costco) into my food processor and whizzed them until they were crumbled.

  • In a separate bowl I added about half a container of Betty Crocker chocolate frosting to the crumbled brownies and mixed them together until the texture resembled truffles.

  • Next we rolled the mixture into balls and placed them on a parchment paper lined cookie sheet.


  • I dipped a candy stick into melted chocolate and stuck that end into the ball. Everything went into the freezer for a couple of hours while Purplicious went for a swim.

Decorating was messy, but fun in a very frustrating sort of way.

Purplicious helping out.

  • I melted some good quality chocolate coating and spooned it over the frozen Brownie Pops. Because the pops were cold I was hoping that the chocolate would set fairly quickly, but it dripped when we were adding the toppings. That was messy!

  • Once all the Brownie Pops were chocolate coated and decorated I put them back in the freezer for an hour or so to set.

I didn't have anything prepared to stand them upright, but I guarantee you those little brownie balls didn't move.

I'm very proud of my chocolate and white marbled Brownie Pop.

Our favorite combinations were white chocolate coated with coconut and dark chocolate coated with peanuts.

I made them again last weekend (using the same shortcuts) for my sister-in-law's birthday. I was concerned that maybe I had beginner's luck with my first batch and that her guests would end up with melted chocolate in their laps.  I almost melted with relief once I knew they turned out.

Mr. StyleBurb made a grown-up version of these Brownie Pops by adding some rum into the mix....

... now that was a good treat!


Thursday, July 7, 2011

Farmers' Market Gazpacho

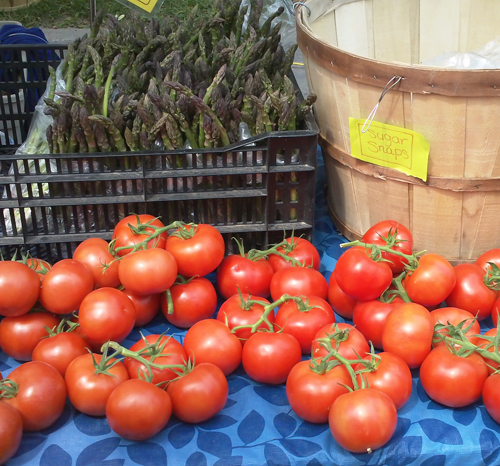
The weather on the weekend was magnificent and I finally made a trip to the Farmers' Market.  The local strawberries are in season and they taste so good!


This is probably the last week for local asparagus, and now tomatoes, snap peas and zucchini are ready.


Soon the rest of the fruit and vegetables grown here will ripen, and I can't wait. In the meantime, the Farmers' Market had some hot house produce and local-ish veggies for sale.


I bought everything I need to make gazpacho - which is a summer time favorite at our house.


Mr. StyleBurb and I love my gazpacho recipe so much that when our 20 year old food processor broke, we replaced it right away with this new fancier version.

Over the years I have tweaked  my recipe for gazpacho until it tasted perfect to us. The aroma of all the fresh veggies is like summer in bowl!

My recipe is really simple.

- whiz 3 cloves of garlic and one small red onion in your food processor
- add in 2 ripe tomatoes, 1 red pepper and 1 green pepper (seeds removed) and 1 large cucumber
- pulse several times to chop everything into bits
- add 1/4 cup of olive oil and 1/4 cup of red wine vinegar and about 1 cup of vegetable cocktail
- add 1 tsp. of salt and 1 tsp. of fresh black pepper

- pulse until you have the consistency you like
- add more vegetable cocktail if you want a thinner soup

Chill the soup for several hours before serving. I like to top our gazpacho with croutons and I always serve Tabasco sauce on the side.  Mr. StyleBurb likes it spicy!


Delicious!


Sunday, June 12, 2011

Fancy Salad

The other day, one of my favorite bloggers, Melissa, from Melissa's Heart and Home showed us a couple of salads that she enjoys in the summer. They looked so delicious that I decided to show you my favorite summer lunch. My daughter called this a 'Fancy Salad' when I first started making it last summer, and the name has stuck.


I use a premixed medley of baby lettuces and crucifer leaves and then pile on blueberries, strawberries, mandarin oranges, sunflower seeds and sliced almonds. Sometimes I add a chopped hard boiled egg.


My favorite dressing for this type of salad is Renee's Sweet Onion vinaigrette (I should caution you that this dressing is a tiny bit 'vinegary'). Since I eat this salad almost every day in the summer, I have probably used 10 bottles of Sweet Onion Vinaigrette since I first discovered it! I may even be addicted, because I always need to have a spare bottle in the fridge.


 I love to mix sweet and savory flavors - you never know what you're going to get next!


Monday, May 30, 2011

Raspberry Stuffed French Toast

My mother-in-law has made this Raspberry Stuffed French Toast for family brunches a number of times and everybody thinks it's really delicious.

We ran out of the raspberry sauce, so I served the French toast with fresh berries.

It seems a little bit fussy to make, but it's totally worth the effort! This style of French toast would be great to serve when you want something a little fancy for a special brunch.

My mother-in-law adapted the recipe which comes from a popular restaurant in Lake Worth, Florida called Benny's on the Beach.  The restaurant version calls for the French toast to be dipped in granola, instead of sliced almonds. I love it with the sliced almonds!

Mmmm.... lovely toasted almonds!


To start, you'll need....

2 slices thick bread
about 1/2 cup of sliced almonds
1 tbsp. butter
powdered sugar for sprinkling

Filling Ingredients...

1/3 cup sugar
3 oz plain cream cheese
2 cups fresh raspberries
1 tsp. vanilla extract

Mix together the filling ingredients in a food processor or a bowl until well combined.

Batter Ingredients...

2 eggs
1/2 cup milk
1/2 tsp. vanilla extract
1 tsp. honey

Mix together the batter ingredients with a whisk.

Raspberry Sauce...

1 cup water
1 cup sugar
1 cup raspberries

Cook the water and sugar in a pan over low heat, stirring until the sugar is dissolved. Then add the raspberries and combine in a food processor.

* I've had this French toast both with and without the raspberry sauce and both ways are delicious, so I think you could skip the sauce if you wanted.

Directions...

Spread the filling between the slices of bread to make a sandwich and press the bread together.

Dip both sides of the sandwich in the egg batter.

Dip both sides of the sandwich into a shallow plate filled with the sliced almonds.

Heat a frying pan over medium heat and melt the butter.

Cook the French toast until brown and then flip over and cook the other side.

Sprinkle with powdered sugar.

Drizzle on the raspberry sauce if you decided to make some.


Since everybody cooks a little differently, you may want to play around with the ingredient quantities until you get something you love.

I hope you like it! I ate the leftovers cold!!


Sunday, May 22, 2011

Chinese Food and Sushi Cupcakes

We celebrated my daughter's 9th birthday last week. When I say 'last week', I mean it literally; all of 'last week'!

In our home, "birthdays" mean a Friend Party, a Family Party, a Special Dinner and a Cake on Your Actual Birthday, and Treats for Classmates at School. My three kids and my husband all have birthdays within one month of each other.  So, we eat a lot of cake between the middle of May and the middle of June!

This year my daughter asked me to make these adorable little sushi cupcakes to bring to school and share with the kids in her class (she had seen the idea in the Family Fun Crafts for Kids magazine).

 
These little cupcakes are so easy to make and the kids loved them!  You use a cylinder cookie cutter to make the 'sushi' shaped cakes out of pound cake.


Wrap a piece of fruit roll-up around the middle. The fruit roll-up sticks to itself- the same way it does to the grooves in your kids' molars!


Frost with white icing and top with coconut, which looks like white rice.


I diced red jujubes, Swedish fish, gumdrops, and red licorice sliced on the diagonal to resemble real sushi toppings.


A whole class set of sweet sushi cakes fits nicely into a 9x13 pan.  Apparently I have requests to make these again!


That took care of the Treats for Classmates at School portion of the birthday, next came the Friend Party.

This year, my daughter wanted to take five friends out for dinner at her favorite Chinese restaurant, and then enjoy a brownie bar and movie back at our house.  The restaurant she chose is right out of the movie, A Christmas Story (Ralphie... you'll shoot your eye out)!

The Chinese restaurant from the movie A Christmas Story.

The girls had a wonderful time! They had their own table for six, and my husband and I sat close by at our own table. Their conversations were hysterical!

I made loot bags out of Chinese food takeout cartons which I filled with all kinds of goodies for my daughter's friends.


 I stuck hair accessories shaped like chopsticks through the top...


... and then printed takeout menus and taped them to the top of the cartons with a "thanks for coming to my party" message.


Everyone had a fantastic time!

That's the brief version of my nine year old's birthday!

My oldest daughter turns fifteen next week and she's planning a sleepover party with her girlfriends. I'm not sure who's coming, how long they're staying, or how this will impact our neighborhood garage sale in the morning, but I'm sure I'll find out soon.... I hope!


I'm joining Debbie's Newbie Party this week!

Sunday, April 3, 2011

Grandma Joe's 63 Year Old Stand Mixer (and her banana bread recipe)

Over the last few months I have been baking my way through some recipes given to me by my husband's Grandma Joe.  Grandma Joe passed away last September at the age of 92.

Last week I received an email from my mother-in-law with Grandma Joe's recipe for Banana Tea Bread.  There are hundreds of recipes for banana bread, and I am always searching for 'The Best'.  I believe have found it!

The recipe for this delicious banana bread is at the end of the post. 

My mother-in-law also sent along pictures of Grandma Joe's 63 year old KitchenAid Stand Mixer. The mixer was used daily by Grandma Joe who baked all sorts of cookies, cakes, squares and loaves.

My mother-in-law now uses the stand mixer and tells me that it purrs like a kitten and has a powerful and strong motor.  The stand mixer is in excellent condition considering its age!


Grandma Joe's stand mixer with both the original glass and stainless steel bowls.


Grandma Joe would have bought her stand mixer sometime around 1947.  To put her purchase into perspective, World War 2 had ended a couple of years prior and the Cold War had just begun. It's a Wonderful Life was nominated for Best Picture at the 19th Academy Awards.


The handle on the old stand mixer is the same as traditional hand-held portable mixers.


This 1940's magazine ad for the KitchenAid Stand Mixer extols the wonders of this "Electric Maid": "It mixes... mashes... beats... whips... strains... sieves... grinds... shreds... chops... slices."


I guess the wife in the ad didn't have time to change into her yoga pants and watch the latest episode of Glee!

The design hasn't changed much over the years, but the color choices have increased greatly. KitchenAid Stand Mixers are now available in over 20 different colors!

A handle has been added to the work bowl on modern day mixers.


My husband's mom used to get the job of banana masher for the banana bread when she was a little girl, but since she wasn't available to mash bananas for me, I enlisted the help of my own little girl.


My little banana masher!


This banana bread was fresh from the oven when I took the picture.


Grandma Joe's Banana Tea Bread


Ingredients:
1 3/4      cups sifted flour
2  tsp.     baking powder
1/4 tsp.   baking soda
1/2 tsp.   salt
1/3          cup shortening  * see note
2/3          cup sugar
2             eggs well beaten
1             cup mashed bananas (2-3)


Directions:

Sift together flour, baking powder, baking soda and salt.  

Beat shortening (or butter*) until creamy.  Add sugar, add eggs. Beat well.

Add flour and bananas alternating each a small amount at a time. Beat until smooth.

Grease bread pan and bake for 50-60 minutes at 350 degrees F.

* The original recipe calls for shortening, but I used the same amount of butter instead.  I also tossed in a handful of chocolate chips for fun, although this was really unnecessary since the banana bread was moist and sweet enough without the chocolate.


This banana bread was so delicious...it was gone by morning! Next time I will double the recipe.

As Grandma Joe used to say: Enjoy!


I'm linking up to http://debbie-debbiedoos.blogspot.com/


Sunday, March 13, 2011

Grandma Joe's Sour Cream Coffee Cake

It's been cold and rainy here for the last few days.  It's a good day to stay inside and bake something sweet and warm and I have the perfect treat!


Several years ago my family headed south to Florida to visit Mickey Mouse, a few Disney princesses and my husband's two Grandmothers (who could have been Disney princesses in their youth!)

My husband's Grandmas were former New Yorkers who were spending their golden years in retirement homes in the 'Sunshine State'.

During our visit to Florida we often had dinner with Grandma Joe in her retirement home's lovely dining room.  We were treated like royalty as she led us through the dining room and paused at each table to introduce us to the other residents.

"This is my grandson and his family from Canada", Grandma Joe would explain to her friends.  When you're a teenager, having a car is status; when you're an octogenarian, having family who visit is most important - for lots of reasons.

Each night after dinner, we sat with Grandma Joe in her apartment and talked about her life as a younger woman.  All the while, our kids filled themselves with the Hershey Kisses and soft drinks she had brought in specially for them. 

On the last night of our vacation, Grandma Joe offered to let me search through her recipe boxes and take any recipes I wanted.  She was a serious baker in her day (from what I hear, she was thorough, efficient and accomplished in all areas of homemaking.)  Many recipe cards had already been passed along, but there were still a lot of dessert ones remaining. Perfect, if you ask me!

The recipe cards remained tucked away in my cupboard because I have a horrible habit of eating my own baking and when you're over 40, calories don't burn the way they used to!

Grandma Joe died this past September at the age of 92.  It gives me goosebumps to write about it, but for some reason, since then I have felt like following her recipes for cakes and cookies.

I suppose the recipes are a little old-fashioned, and there's no way any of it is low fat!  But, you've got to enjoy yourself....maybe have just a little piece.


I'm sure Grandma Joe never imagined her handwritten instructions to make sour cream coffee cake would end up on the internet.  She probably jotted the recipe down from memory, which is why I think the order of operations might be a bit off, so I have made adjustments in a couple of places.

As Grandma Joe would say: "Enjoy".


Sour Cream Coffee Cake (Excellent)

 Cake Ingredients:
1/2  cup     butter or margarine
2               eggs
1     cup     white sugar
2     cups    flour
1     tsp     baking powder
1     tsp     baking soda
1     tsp     vanilla
1     cup    sour cream (I used the high fat kind)

Filling Ingredients:
1   tsp or more cinnamon
1/2 cup brown sugar
1/4 cup chopped walnuts (I used pecans instead)


Directions:
Filling: Combine cinnamon, brown sugar and nuts in a bowl and set aside.

Cake: Cream butter or margarine.  Add white sugar and eggs.  Add in vanilla and sour cream. In a separate bowl, combine flour, baking powder, baking soda and add to the creamed mixture.

Pour half of the batter into a greased and floured tube or bundt pan. Sprinkle on half of the filling mixture. Layer rest of the cake batter and top with the remaining sugar and nut mixture.


Bake at 350 degrees for 40 to 45 minutes.


I'm linking up to http://debbie-debbiedoos.blogspot.com/


Sunday, February 20, 2011

Sunday Morning Pancakes

The three kidlets in our house are not fans of breakfast cereal.  They also don't like toast, frozen waffles or instant oatmeal.  They do really enjoy cooked breakfasts: eggs, sausage, omelets, hashbrowns; but we're usually too rushed in the morning for anything fancy. I wouldn't classify my kids as breakfast snobs, because two of them would happily eat Pop-tarts or a handful of Pringles in the morning if I let them. Since I would like my children to eat something that's more nutritious than cardboard, I keep an eye out for yummy yet healthy recipes for breakfast that can be made in advance.

I found this recipe for Ricotta Pancakes in our local newspaper.  I like that these pancakes are made with milk and ricotta cheese, because my youngest daughter doesn't drink milk. I think they taste great without syrup.  The kids think I'm nuts, though.  I've made these pancakes many times since school started in September, so I think this recipe is a keeper.

These pancakes are perfect to make on the weekend.  You can make a big batch, cool them completely and then freeze them.  The pancakes can then be reheated in the toaster. 

By the way, don't try to fish small pancakes out of the toaster with a fork...or you'll have more problems than what to feed your kids in the morning!

Ricotta Pancakes


Ingredients

2 cups    all-purpose flour
1 Tbsp.   baking powder
1 tsp.      salt
4 Tbsp.   sugar
3 large    eggs, beaten
1 cup      low-fat ricotta cheese
2 cups    cold milk
1 Tbsp.   vegetable oil

Directions

Combine dry ingredients in a large bowl. In separate bowl, mix eggs and ricotta then stir in milk and oil.  Stir wet ingredients into dry ingredients, being careful not to over mix.  Pour batter onto hot non-stick pan.  Flip when bubbles appear on the surface of the pancake. 


P.S.   If you see me with my youngest daughter, and you want to tell me how wonderful this recipe is, please don't mention that these pancakes are made with r.i.c.o.t.t.a.  c.h.e.e.s.e., or they will be yet another thing she refuses to eat! Thanks!!