Showing posts with label projects. Show all posts

Wednesday, June 22, 2011

Painted Pots

Last week while Mr. StyleBurb sanded and re-stained our back deck,


I dragged out my spray paint booth to give our mismatched flower pots a fresh look for summer.

I know...  you want one too!
Our flower pots were a mixture of colors and styles- some plastic and some terra cotta. I decided that the best thing would be to unify them with a few coats of soft black paint. We have black outdoor furniture and I love the way black looks with our taupe deck stain.  I used Rust-oleum's oil rubbed bronze spray paint that says it can be used on "wood, metal, plastic, masonry... and more."

Clearly I didn't plan to paint our flower pots when I put annuals in this big planter a month ago!


 Our flowers had to spend an afternoon covered up with a garbage bag.


But everything worked out ok, and I think the planter looks very sharp!


 I've had this large terra cotta pot in my garage for years.


 Now it's holding my tomato plant.  I even have tomatoes!


Every year we buy hanging baskets from the garden center and every year the plastic pots are different colors and shapes.  We have quite a collection.

I removed the hanging apparatus, wiped them down and spray painted a few of these plastic pots as well.


I didn't prime anything I painted- I barely cleaned off the cobwebs- and I have no idea how long the paint finish will last, but I'm really pleased with how they look right now.


This green plastic pot won't make it through another summer- there's a hole in the back...


...but it looks better black, too. I wish my flowers looked a little healthier. I'm hoping they'll fill in and hide the green rim.
 

I bought some double bloom pink impatiens that needed to be re-potted, so I bought a few of these little cheapy guys at the dollar store.


I spray painted them gloss white and hot glued on some cute lady bug buttons I found at Michaels.

Again, I don't know what is going on with my flowers- they look a little sick. 


If they don't start looking prettier soon, I'm going to spray paint them as well!

I really want to show you how my deck looks, so I'm working on that post next.


Wednesday, June 8, 2011

May and June: The Busiest Time of the Year? Discuss

Are May and June crazy busy months for you like they are for me? There's Mothers' Day, Fathers' Day, multiple birthdays, graduations, school recitals, weddings, showers, the start of soccer and baseball season, tonnes of end-of-year school stuff, gardening....

These are all exciting, fun and wonderful times, but it doesn't leave a person a whole lot of time to get her decorating projects done! Oh well, the projects will wait!

Here's a little round-up of what I've been doing lately.

I've already talked about my youngest daughter's birthday party. I finally found a picture of the girls as they enjoyed the brownie bar I set out for them.  We eat a lot of cake in May and June, so the brownie bar was a fun change!


Then, my oldest daughter celebrated her birthday the weekend after.  She invited some girl friends over for a sleepover. They watched a few classic 'chick-flicks' and laughed a lot! We decided not to venture through the clouds of perfume to take any pictures!

My son invited some guy friends over last weekend to celebrate his birthday with- you guessed it- a sleepover party as well! Mr. StyleBurb took them to a nearby driving range to hit a few buckets of golf balls first. We had a barbeque for dinner (I think my friends in the U.S. would call it 'grilling') and pancakes and bacon for breakfast the following morning.

One thing I'm learning about teenage boys is that no matter how much food you cook, it will never be enough!!

This is our basement the morning after the party- very tidy, all things considered.


In between all the partying, we spray painted some pots...

pots before getting the 'oil-rubbed' bronze treatment
... planted some containers...


 ... leveled the interlocking walkway...


 .... and sanded the back deck so that it can be restained...


Technically, Mr. StyleBurb and my son did the interlocking and deck sanding, however I stood ready to offer cold drinks and helpful hints!  Hopefully, the stain will go on this week, so I can arrange the outdoor furniture and flowers in time for the next few parties. No pressure, though!

So, that's the brief version of what's been going on here- there's still more to do. Yes- we're busier now than we are at Christmas-time!

I know you've all been really busy, too. Tell me, is this your busiest time of the year?


Sunday, May 8, 2011

Summer Mantel, Had Me A Blast

(Bonus points if you know the reference of my post title!)

The mantel on my fieldstone fireplace got some summer lovin' last week.  I decided to keep the look very clean and simple looking.

Inspired by the white seashell fabric on my new pillow covers, I added a pair of sugar starfish, some new/newish white accessories and refreshed the mirror by painting it Heirloom White.


We already had the hurricane lanterns with the seagrass base. I bought them from Pier 1 Imports last year and noticed when I was there recently that they are still available.

I found the new- but old looking- chippy urn from Pottery Barn and filled it with a small shamrock plant.

The urn needed a little bit of height so I turned the covers from two books inside out and slipped them underneath. (Finally, I have a use for Tori Spelling's autobiography.... don't judge... I loved the original 90210 when I was younger!)


My dog, Harry has barked his opinion a number of times during my family room makeover.  You may recall that he complained about the BM 'Cable Knit' paint sample I was trying out until I painted it over.

Now, he seems to have a problem with the starfish- for some reason he keeps staring at them! Who does he think he is, Tommy Smythe?  This time, I don't care what Harry says, I like them and they're staying.

Painting the mirror white has really lightened the look!  Here is my mantel before its summer makeover.


And after.


The pillar candles that used to be on the mantel have been painted Heirloom White and grouped on a tray with the white shell ball.  I'll show you where this little arrangement calls home soon.


Click here to see pictures of my family room before the updates.


Clean, fresh and bright!


Did you figure out my post title's song reference?

For those of you who are too young to remember, or not as obsessed with musicals as me, the song is from Grease and the opening number is called Summer Nights. (Raise your speaker volume... it's worth your 3½ minutes!)


Monday, May 2, 2011

Family Room Update: Pretty Pillows

Have you ever noticed that the things you aren't very good at are often ones you don't like?

That's not always true.... I have proof!

I love to sing!  However, I rarely know the correct lyrics to all the songs I sing, and judging by the cut-eye looks I get when I do sing, I know that I'm not particularly tuneful. Actually, that was a comment on my second grade report card: "Yvonne is an enthusiastic participant during music class, though she is not often in tune". Didn't stop me. I'm still singing!

And I'm still sewing. I've said before that I'm not much of a seamstress (fact, not false modesty), but I love to sew. I can only manage straight lines, but you might be surprised at what you can create by sewing straight! (or, straightish, as the case may be)

Last weekend I had the joy of making new pillows for my family room, which is undergoing a little freshening up. I'm trying to bring light, bright and white into this room.  I already knew I wanted white fabric for some pillow covers when I visited my favorite Home Decor fabric store.

It ate away at my heart a little to have to leave such gorgeous fabrics at the store.


This white, heavy weight cotton appealed to me and inspired more ideas for how to decorate the family room.


Checking to make sure it looks good with the pillows I already have...


 We have a winner!


I made envelope-style pillow covers, which require only basic math, a little measuring, a quick press with the iron and straight sewing- no zippers or buttons required. There are tutorials all over blogland on how to make this style of cover, but I found Kim's (Restoration House) tutorial very helpful.

Tip: Some of my pillows were extra plump and I found that by adding three or four extra inches to the fold over flap I was able to get crisper corners.


Front of the pillow

Back of the pillow

Tip: It wasn't easy to find inexpensive down pillow inserts, so I checked the clearance section at HomeSense and found down-filled pillows for only $10 a piece. I replaced the store bought covers with my own.

The new pillows have really lightened the look of the green corduroy sofas. 


 Lots of comfy pillows.


The black wall sconce to the left of the sofa has been painted white.  New white accents co-ordinate well with the white pillows.


I also found a fantastic dragonfly print, so I bought one yard and made a 6th pillow cover.  I think this pillow is my new favorite!


I felt like Martha Stewart as I whipped up pillow after pillow! I might even try out the zig-zag stitch on my sewing machine!

Thanks for visiting!


Monday, April 25, 2011

Fun Family Photo Cubes

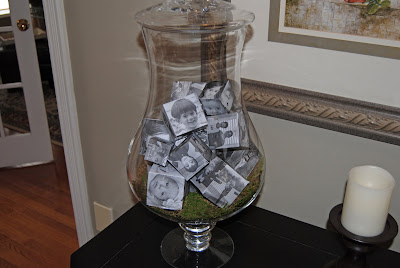
It's true that I always have a 'what's next list'.  In fact, I started to plan a new arrangement for my giant apothecary jar two weeks ago.  I liked the black and white vintage look of my newsprint Easter eggs and decided to create a display with a similar feel.

I love family photos from past and present. Mr. StyleBurb recently organized all of our family pictures and burned them onto DVDs.  I wanted to somehow turn those pictures into black and white cubes for my apothecary jar.


I selected a wide variety of photos from our immediate and extended family. There are baby pictures of my husband and his sister next to baby pictures of our own three children.  You'll see that I used a combination of head shots and group shots for interest.


My idea for these photo cubes was hampered by my lack of technical skill, so I consulted my Personal Assistant (aka Mr. StyleBurb) to help kick start this project. If I can learn how to do this, anyone can... believe me!


Step 1  Gather copies of all the photos you want to use and crop them to be square.  A few group shots are good for variety, but the majority should be close-ups.

Step 2  Load the following template into your favorite photo editing program.


Click on this template to view it full size and then save it to your hard drive.


Step 3  Import your cropped photos on top of the cube template and resize them to fit within a square.


This is a screenshot of Photoshop Elements as the picture is being resized.


Tip: You can duplicate photographs on opposite sides of the cube.  Only one side will be visible at any given time.

Step 4  Print the finished sheet. I used a black and white laser printer.  By changing the printer settings you can make a variety of cube sizes.

Step 5  You'll need your second grade 3D geometry skills to cut, fold and tape/glue the flat sheet into a cube.


Here are my photo cubes ready to go...


I layered the bottom of the apothecary jar with green moss.


You see different photos from every angle.


A black and white picture of black and white pictures!


.